
*Disclaimer: This post contains affiliate links, meaning that if you choose to click through and make a purchase, I will receive a small commission at no cost to you. I was also compensated to create this post, though all opinions are my own.
Do you use Pinterest for traffic to your blog, YouTube channel, social media platforms, digital products, or online courses? Then, I’ll teach you how to make beautiful pins for Pinterest using Tailwind Create.
Well, for many bloggers, new or expert, Pinterest is a traffic goldmine. The visual platform is a great way to grow your blog into a sustainable business. If you’ve been using Pinterest to search for inspiration, it’s time to level up your game and use Pinterest for traffic as well.
If you’re unsure how to get started with Pinterest, we got you covered.
Upon starting my two blogs in March 2020, including Homes N Away, I was looking to grow my traffic and accessed Emily’s Course, The Big Pin Energy, and I must say that my blog Dal Meets Glam picked up to an average of 10,000+ monthly pageviews by the 7th month.
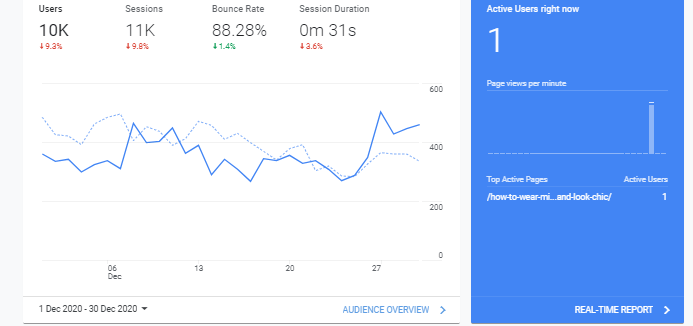
Emily has 2 blogs that average 100,000+ monthly readership thanks to Pinterest and the testimonials on her Twitter account had me buying the course, and my experience has been worthwhile.
You can say yes to traffic too using her course today!
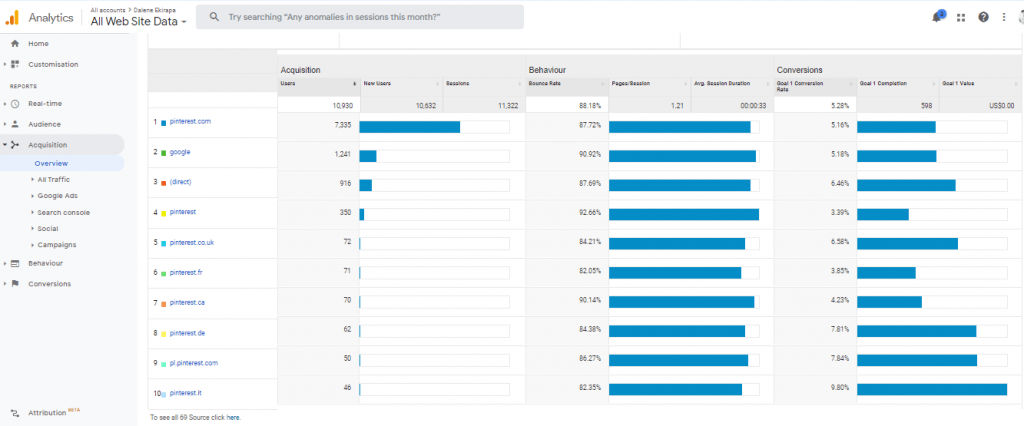
However, one key determinant for Pinterest traffic is good-quality pins. These will attract readers to your blog, get you saves, repins, and lead to the growth of your account.
If you’ve been creating pins with other platforms are you’re unsatisfied by the design, Tailwind is here to up your game.

Tailwind now offers Tailwind Create on their platform, a feature that automatically creates Pinterest-worthy pins for you, allowing you to edit them according to your brand preferences and either download or schedule them directly on the platform.
How Do You Make Beautiful & Click-Worthy Pins With Tailwind Create?
Tailwind is the approved Pinterest scheduler that allows you to plan and schedule your content in advance for pinning on Pinterest. This ensures consistency on the platform thus traffic in a matter of time.
Thanks to their new feature, Tailwind Create, you can easily create fresh pins without thinking about where to get new templates from.
Scroll down to learn how you can use Tailwind Create to make beautiful pins for your Pinterest account;
1. Sign Up For Tailwind
If you’re starting out, sign up for a Tailwind account and connect your Pinterest account to the platform for automatic pinning.
2. Access Tailwind Create On Your Dashboard
Tailwind Create is the fastest way to create beautiful Pinterest images right inside Tailwind! You can easily create, schedule, publish, and analyze all in one place!
The best part is that with Tailwind Create, you can create up to 15 designs per month, every month for FREE.
However, you can upgrade your Tailwind account if you have a Tailwind Plus account so you can be able to create more designs in a month, upload custom fonts and have access to professional stock photos.
For a first time user, you will be required to choose your brand colors and fonts to make it easy for Tailwind Create to customize the templates according to your preferences.
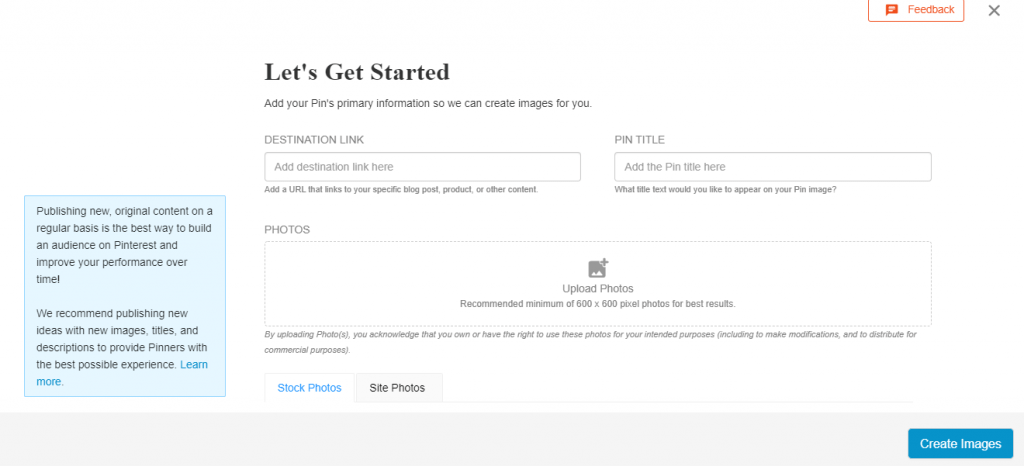
3. Add The Link To Your Blog Article
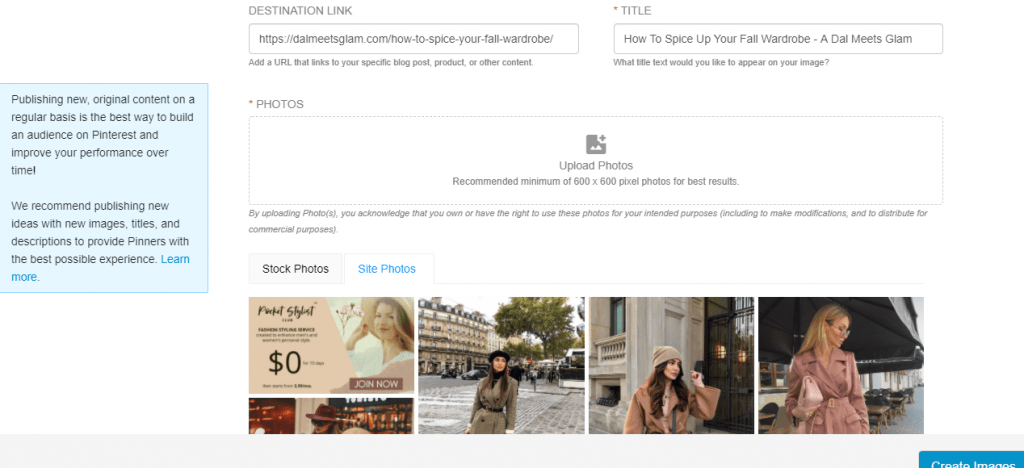
Upon adding your blog’s link, Tailwind Create automatically pulls your blog article title as well as the photos within that article. However, you can also upload other photos you’d want to make beautiful pins with.
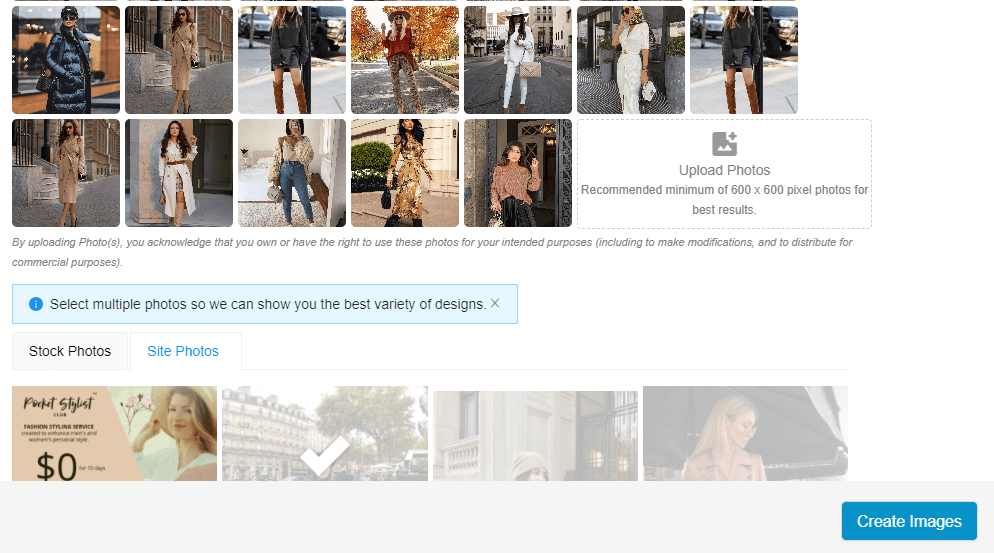
You want to then select the images you’d want to create pins for and click on the ‘Create Images‘ button at the bottom.
Pro Tip…
When designing pins, use high-quality images that are not blurry and are relevant to your blog post.
If you use a low-quality pin, chances are that it will not get any attraction since people easily get turned off if the pin is hard to see and blurry.
4. Edit Your Images In The Design Gallery
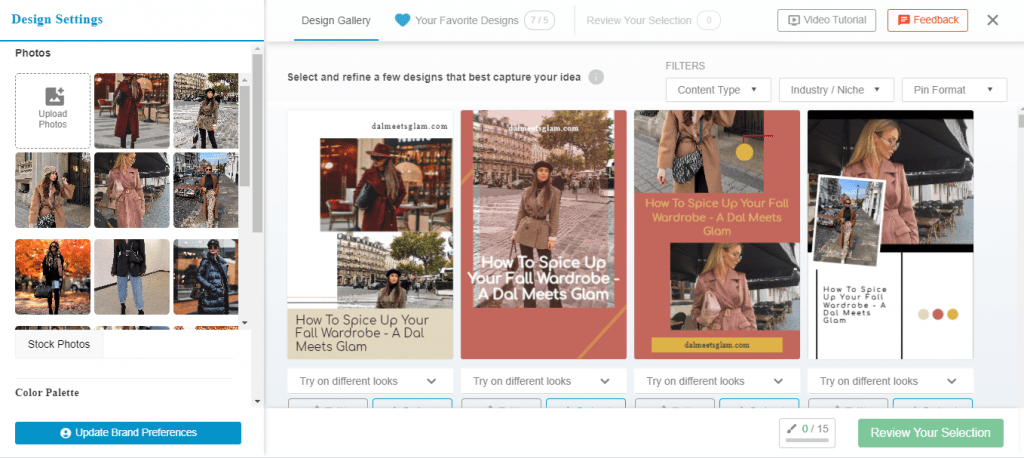
You will be led to a design page that allows you to pick your desired templates from a ton of them.
I actually had countless ready-made pin designs to choose from. I selected the best 7 and added them to my ‘Favorites‘ tab to make it easy to edit the pins.
5. Select & Edit Your Preferred Template
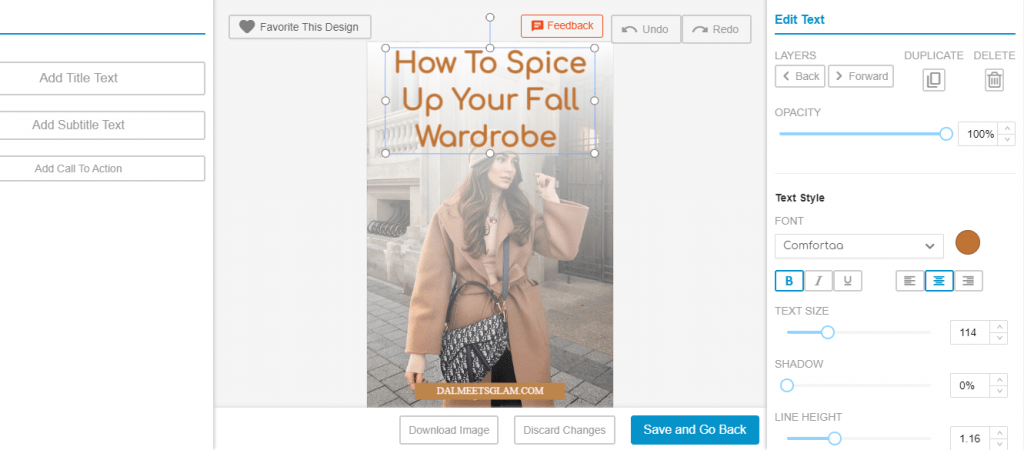
Having chosen your best templates, edit them making sure to follow the guidelines below:
- Use bright colors on your pins. This makes your graphics pop-up, and get more attention. Go for colors that make your pin stand out in the feed like pink, yellow, red, green, orange, etc.
- Use large fonts to make your pin stand out. Your fonts should be easy to read since people’s eyes get turned off with really fancy fonts.
- Brand your pin. For people to recognize your pins, add your logo or website link at the bottom or top of the pin. Be consistent with your fonts, and blog colors. People start noticing your pins and recognize your pins in the smart feed.
Good enough, Tailwind Create keeps all templates vertical as these stand out more in the Pinterest feed. It also automatically adds your website/blog link to your Pinterest image as well as your brand colors.
Pro Tip…
As much as Tailwindwind Create is able to pull your article’s title for the Pinterest image, you can still change it to a more catchy one.
It is recommended to choose a title that shows people what they will find inside the post. People are using Pinterest for getting answers, ideas, and instant solutions. So, give them an idea of what they will learn/find if they click the pin.
The title of your pin should be highly captivating. It should bring readers to your website. In fact, use bold text to make an impact. Check out this guide on how to create viral pins on Pinterest.
Look at this ready-made pin image before editting…
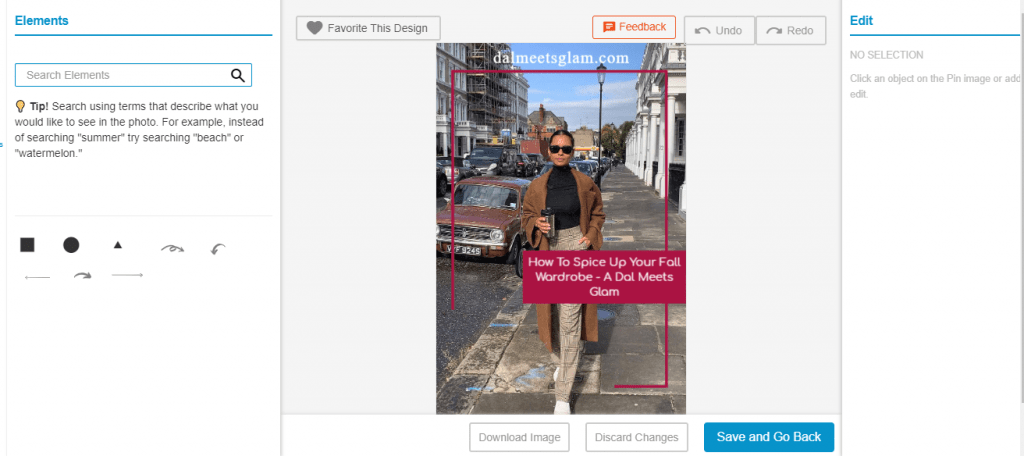
After just a few tweaks…
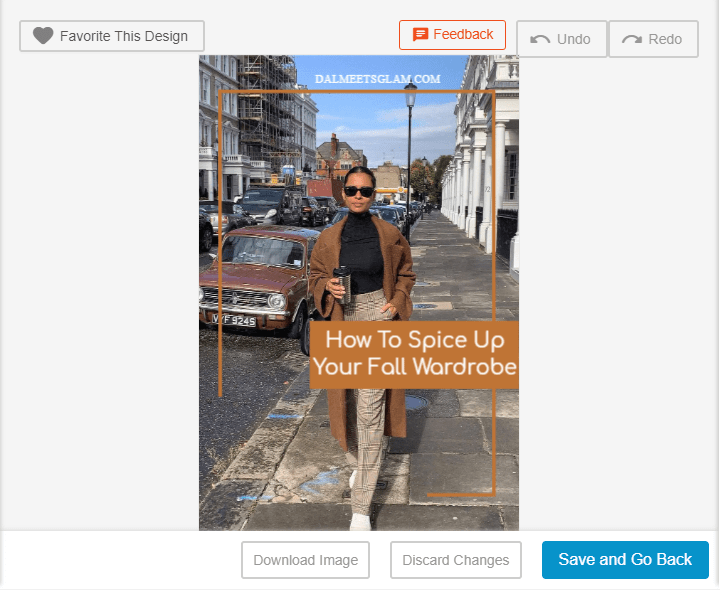
If you’ve noticed, I made just a few edits, including: increasing the font size.
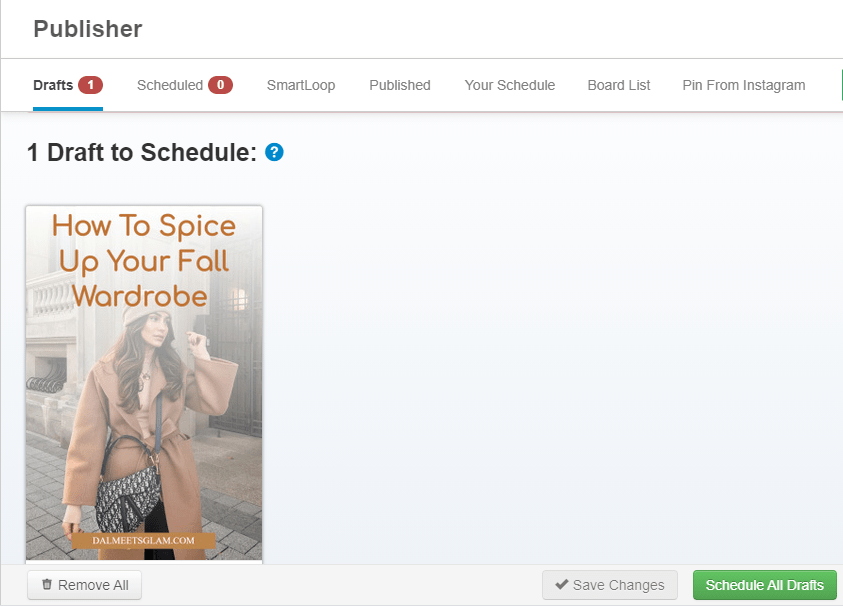
6. Save & Schedule Your Pin
Now that your pin is ready for publishing, click on the save it and go back to the design page.
Select your created design then click on the ‘Review your Selection’ button, which will direct you to the Final Design page where you can refine your preferred template as you please. \
Once that is done, you are able to download your pin image for use as desired. Also, you can schedule it directly on Tailwind to your boards.
I prefer scheduling it directly. This process will take you to your Tailwind Drafts, allowing you to add a description to your pin for scheduling.
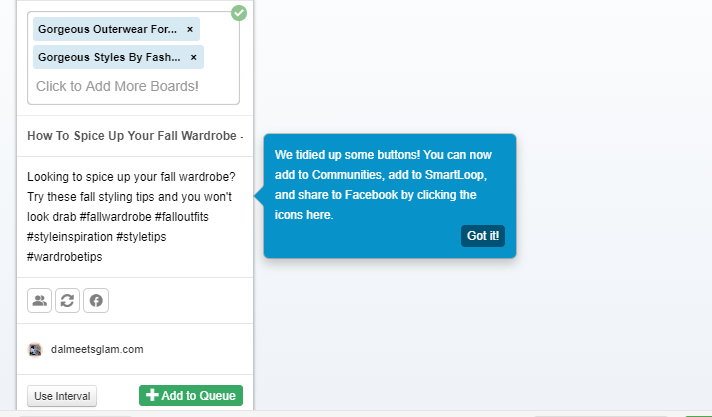
Remember to add a keyword-rich description to make your pin searchable on Pinterest, and include hashtags to expand your reach. It’s wise to use only hashtags that make sense. I have noticed good results with 4-5 hashtags.
Also select the right boards for your pin and add it to your Tailwind queue.
It’s that easy!
Pin This…

Do you want to start a blog? Follow this comprehensive guide to start a self-hosted blog today! It’s a step by step process to start your own blog, and do blogging.